woensdag 6 november 2013
donderdag 26 september 2013
iPhone No Sound Problem/ Issues Steps and Solutions
iPhone No Sound Problem/ Issues Steps and Solutions
If you have no sound on your iPhone 3/4/4S/5 volume bar it is unbelievably frustrating as you most probably already know. I have been looking for cures over the web there are many out there, below you will find a list of all these including the one that worked for me. Also the list is in chronological order of what seems to be most successful. It is a process of elimination but it has to be done.
The symptoms of iPhone no sound Problem/ Issues include:
- iPhone will ring but speaker will not work for anything else.
- iPhone no sound at all for calls, apps, music etc
- iPhone no sound as stuck in headphone mode
Follow these steps and hopefully your iPhone will be back to its prior glory.
iPhone No Sound Step 1,
 Loud/ Silent switch on exterior of iPhone is switched to silent mode which is orange. If so flick the other way to loud mode. This is a step that so many people miss, but it is the most simplest.
iPhone No Sound Step 2,
 Restart the iPhone. Hold the power switch and home button together for 10 seconds. This will restart your iPhone, you wil not lose any media, contacts, data, etc. If there is a temporary glitch on the iPhone this will eliminate that glitch.
iPhone No Sound Step 3,
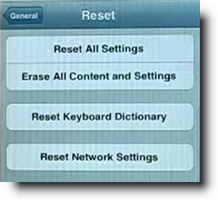 Reset iPhone. Go to settings> general> reset> reset all settings. Make sure to backup your iPhone to the cloud / iTunes as this will wipe your media, music and apps although photos will be left on the iPhone. This is a follow on to step 2 and another way you will be able to eliminate the glitch on the iPhone.
iPhone No Sound Step 4,
 This one is a bit weird but it worked for me for a while and has worked successfully for other people. Squeeze the bottom right hand corner of the phone above where the speaker is. The left Side is a mic not a speaker so don’t worry about that side. Hold that grip for about 20 seconds. This is done as the connector may be loose and had to be repositioned correctly. Yes strange but most of these solutions are.
iPhone No Sound Step 5,
 Use a tooth brush to clean the docking area where you charge your iPhone. With dirt, dust, grime and so on it may block the connectors working correctly and makes the phone think it is on a music dock. When you do this do it gently and get the bristles into there good. Also if you use rubbing alcohol, acetone or methylated spirits it will help get all the extra dirt out. As these products evaporate it will not do damage to the connectors. Do not use mineral terps when cleaning as it is oil based and will not dry!! This seems to be one of the most successful solutions.
iPhone No Sound Step 6,
 Get your headphones and insert them into the headphone jack. Do this for a couple of minutes as sometimes it gets stuck in headphone mode so this normally undoes that.
iPhone No Sound Step 7,
 Restore your iPhone on iTunes. Click on your iPhone icon when plugged into iTunes and go to restore. If you do this make sure your iPhone is backed up as YOU will loose all data, media, contacts, pics, and so on. This puts your iPhone back to factory settings.
iPhone No Sound Step 8,
Jailbreak your iPhone to find the file directories that are causing the fault. By doing this you are deleting the file that is making the iPhone think it is on a dock. You will still be able to use music docking station etc. If you have a jail broken iPhone or willing to do it then this will be the best option for you. Very simple video and easy to follow, to jailbreak follow my simple tutorial.
iPhone No Sound Step 9,
 This worked for me!! The squeezing step worked for me for a small amount of time. Not much else worked so thought I would try my own cure…. An old hair dryer!! Turn on low heat and hover over the speaker outlet for about 5 minutes. I also did the headphone jack as well. There must of been some residual moisture build up which the hair dryer eliminated:)
iPhone No Sound Step 10,
 It may be a hardware problem and simply need to get a replacement through your provider or apple support.
dinsdag 24 september 2013
Dragon naturally speaking 12. Now really cheap!!!
Ever wanted your computer to do what you say?? The solution is here!
For only 20 euro's (excl. sending) you can get Dragon naturally speaking 12 in English. The full Proffessional version.
Check the video!!
You can pay by PayPal.
Send me an email and order it!!
For only 20 euro's (excl. sending) you can get Dragon naturally speaking 12 in English. The full Proffessional version.
Check the video!!
You can pay by PayPal.
Send me an email and order it!!
Laptop starting up but then not responding? Windows 7 common problem!
Be aware, you might lose all your data!
What are the system recovery options in Windows? Windows 7 Windows Vista Windows 7 Windows 7 Windows Vista
--------------------------------------------------------------------------------
Windows 7
The System Recovery Options menu contains several tools, such as Startup Repair, that can help you recover Windows from a serious error. This set of tools is on your computer's hard disk and on the Windows installation disc.
Notes
•You can also create a system repair disc that contains the System Recovery Options menu. For more information, see Create a system repair disc!
•If you use a Tablet PC or other computer with a touchscreen, you might need to connect a keyboard and mouse in order to use Startup Repair and the other tools in the System Recovery Options menu.
zondag 22 september 2013
Google chrome extremely slow?
Few fixes for slow Google Chrome.
Disable Plugins
By default, when you install Google Chrome, many unnecessary plugins are installed and enabled. Plugins help Chrome process special types of content, such as Flash, Java, Silverlight, or Windows Media files, but most of them aren’t even important to your daily browsing. Plugins can slow down the performance of Chrome, but you can disable plugins you are not using. To do this, type “about:plugins” (without the quotes) in the address bar of Chrome and press Enter.
NOTE: You can safely disable every single plugin, but you may want to keep Flash enabled, as a lot of sites use Flash to display menus, show videos, etc. Also, if you watch Netflix in Chrome, you need to keep the Silverlight plugin enabled. You can always enable a plugin again if you need to.

A list of installed plugins displays on the current tab. Scroll through the list and click the Disable link for each plugin you feel you don’t need.
NOTE: Plugins cannot be deleted or uninstalled, only disabled. An exception would be a plugin that was installed as part of an extension and you uninstall the extension. Then, the plugin is automatically removed.

Disabled plugins turn gray in the list, and the Disable link for each disabled plugin becomes an Enable link, allowing you to enable the plugin again, if desired.

Disable Extensions
Extensions are small programs available in the Chrome Web Store that add extra features and functionality to Chrome. They can be very useful, but if you end up with a lot of extensions installed, the browser’s speed may be negatively affected. You can easily disable extensions without uninstalling them to gain some speed. Some extensions install a button on Chrome’s address bar, and those can be quickly disabled by right-clicking on them and choosing Uninstall from the menu.

You can also install apps in Chrome, that are accessible on the New Tab page. These can also be disabled.

To access your list of installed extensions and apps, click the wrench icon on the toolbar and select Tools -> Extensions from the drop-down menu. You can uninstall extensions with buttons without accessing this list, but you might be surprised that some extensions are in the list that don’t have a button.

To disable an extension, click the Enabled check box to the right of the extension’s title in the list so there is no check mark in the box.

The Enabled check box becomes an Enable check box, allowing you to re-enable the extension at any time.
NOTE: You can also easily remove any extensions or apps you don’t want anymore by clicking the trash can icon to the right of the Enabled check box.

Notice that there are a lot less extensions on our toolbar now.

Clear Browsing Data
As you browse the web, Chrome’s history database collects URLs and cached texts for websites you’ve visited, your download history, cookies, and other website and plugin data. While the point of the history and cache database are to speed up your computer by caching things locally instead of having to download every time, sometimes the history database can become very large and may slow down Chrome.
NOTE: You shouldn’t clear your history regularly for speed purposes, as that defeats the purpose of a local cache. You can certainly clear it for privacy reasons though.
There are several ways to clear your browsing history, including clearing your entire history and clearing the history for specific sites.
Clear Your Entire Browsing History
To clear your entire browsing history, click the wrench icon on the toolbar and select Tools -> Clear browsing data from the drop-down menu.
NOTE: Clearing your entire browsing history prevents matches from displaying when you start typing URLs in the address bar.
Iphone problem! Screen freezes! Touchscreen remains black! Touchscreen stops responding!
What to do?

To restart iPhone, first turn iPhone off by pressing and holding the Sleep/Wake button until a red slider appears. Slide your finger across the slider and iPhone will turn off after a few moments.
Next, turn iPhone on by pressing and holding the Sleep/Wake button until the Apple logo appears.
Is iPhone not responding? To reset iPhone, press and hold the Sleep/Wake button and the Home button at the same time for at least 10 seconds, until the Apple logo appears.
If your device does not turn on or displays a red battery icon, try recharging next.
 Restore iPhone
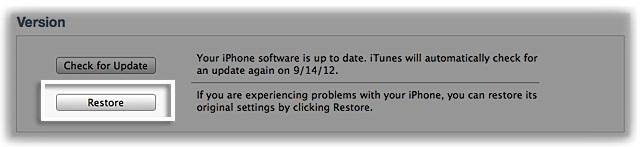
To restore your iPhone, first make sure you are using the latest version of Itunes.
Next, connect iPhone. In the left column under Devices, click on your iPhone, then click on Restore in the Summary tab.
Next, turn iPhone on by pressing and holding the Sleep/Wake button until the Apple logo appears.
Is iPhone not responding? To reset iPhone, press and hold the Sleep/Wake button and the Home button at the same time for at least 10 seconds, until the Apple logo appears.
If your device does not turn on or displays a red battery icon, try recharging next.
If this problem appears more often, then restore your phone!
Make sure you make a backup!Restore iPhoneTo restore your iPhone, first make sure you are using the latest version of Itunes.
Next, connect iPhone. In the left column under Devices, click on your iPhone, then click on Restore in the Summary tab.
Broken Home-Button 7 Fixes for your Home-button!
Broken Home-Button
7 Fixes for your Home-button!
Fix 1: Calibrate Your iPhone
The very first thing you should try with your iPhone is calibration. It's the fastest and easiest method for fixing your Home button, though, it won't work for everyone. Just open up one of the native iPhone apps, like Weather or Clock, and follow these steps.
Press and hold the sleep button until the slide to power off swipe bar appears, then release the button.

Now, press and hold the Home button until the phone returns to the home screen.
That's it. Two steps. If it worked for you, cool, it was probably due to an app not loading or closing properly. If you never even made it past the second step, then you've got some more possible fixes to try out...
Fix 2: Realign Your iPhone's Connector
How long have you had your iPhone for? A while probably, and you've more than likely charged it every single day since you got it. So, it's quite possible that you might have inadvertently shifted some things out of place plugging and unplugging that 30-pin connecter everyday.
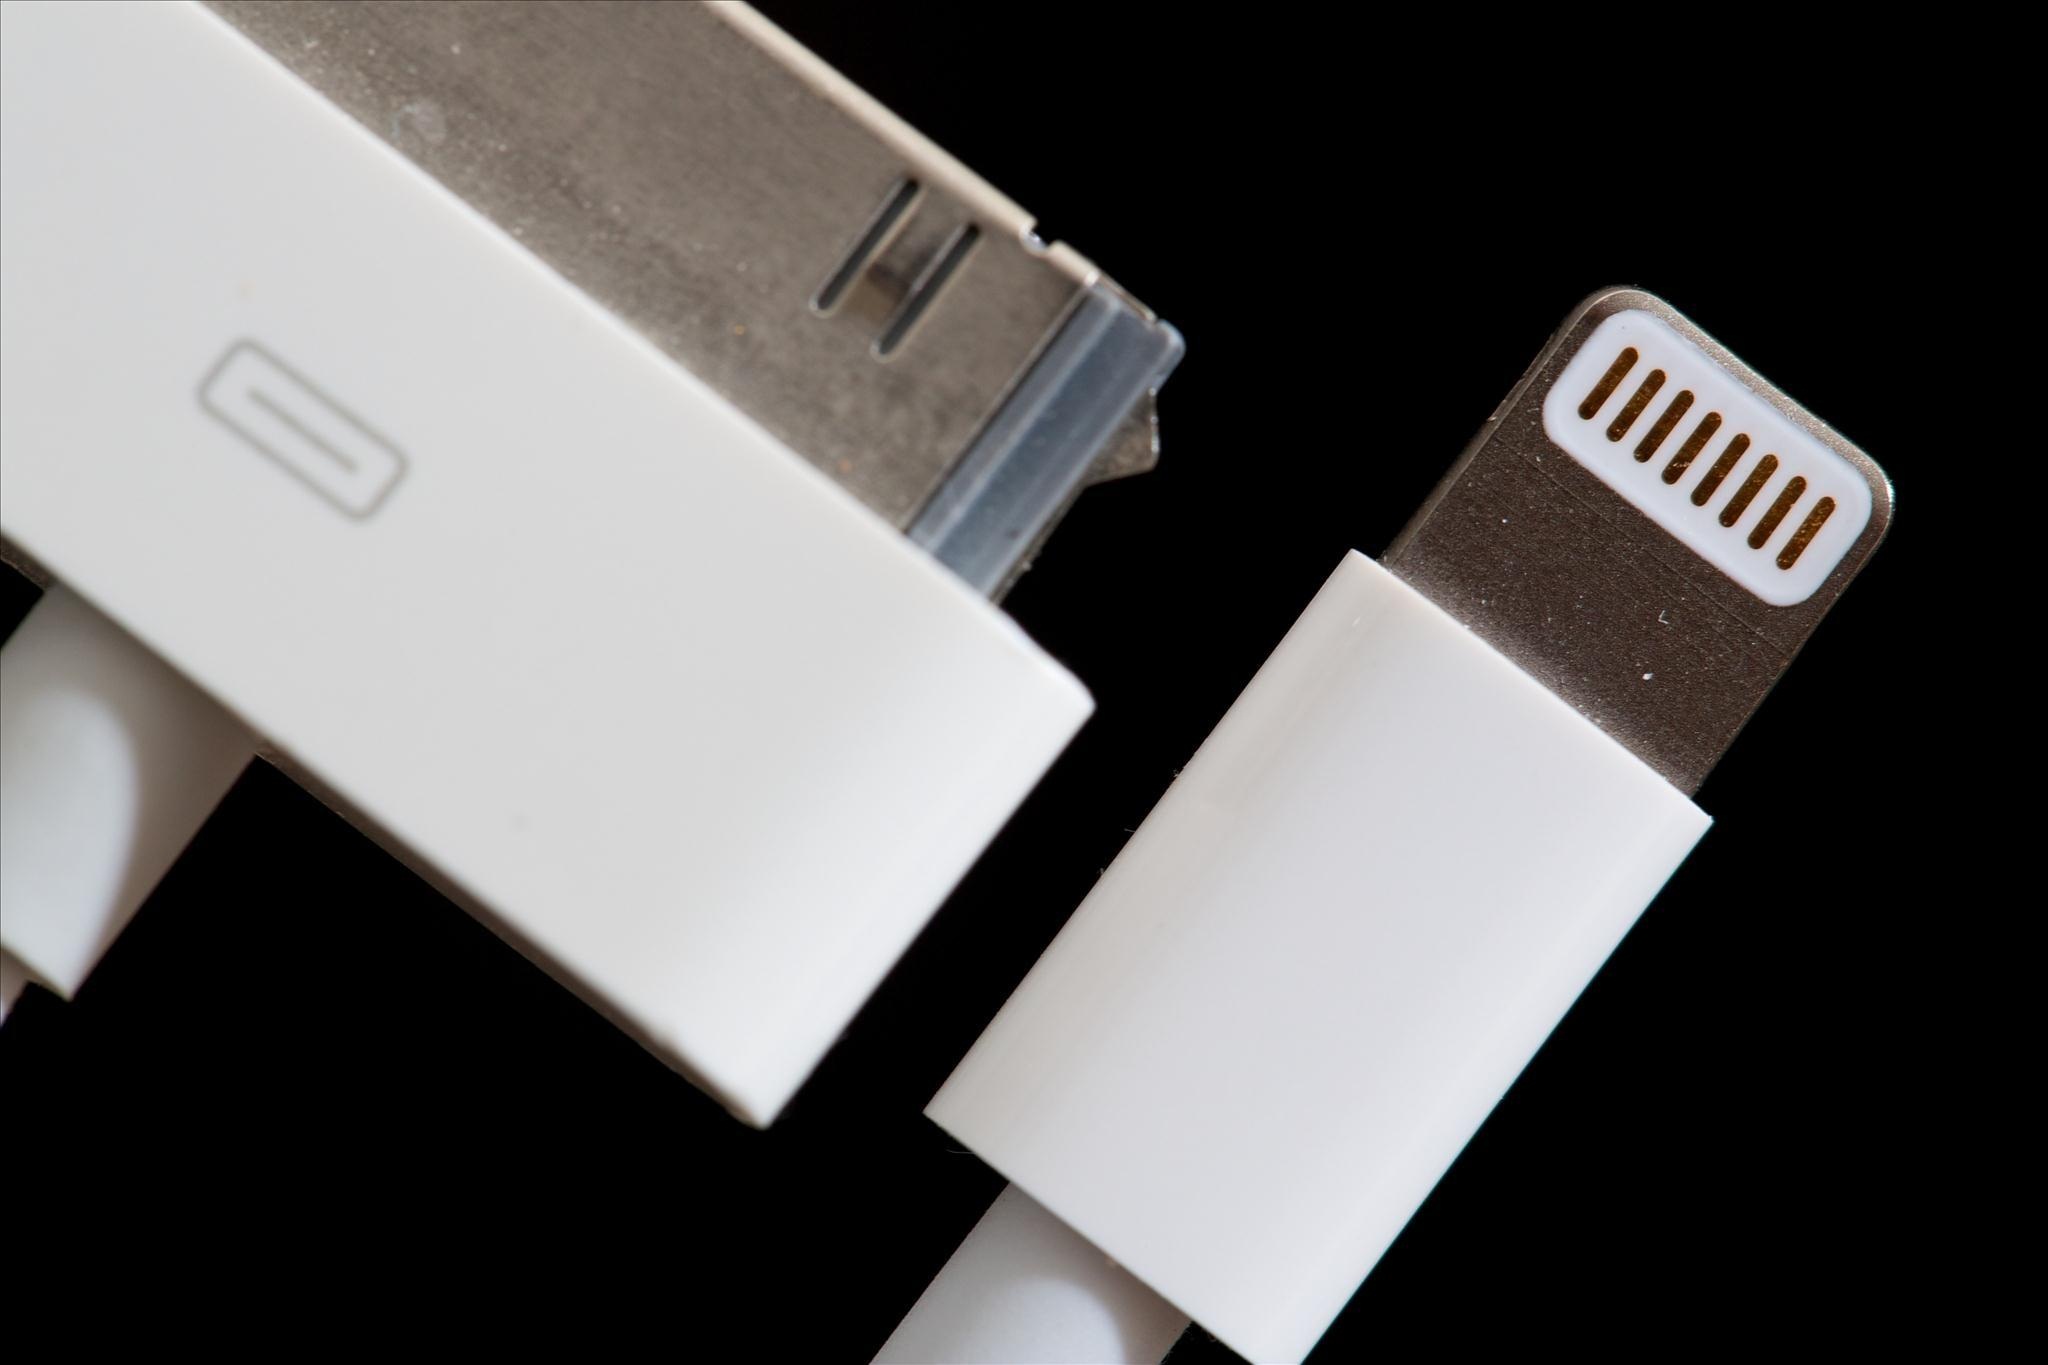
Since the Home button is directly above the connector port, it's common for the 30-pin connector to knock the home button out of alignment.

To remedy this, simply plug the connector into your iPhone and push down gently on the connector, which will force the Home button upward. As you're pushing the connector, press the Home button and see if that solved your problem. If so, cool. No? Try this...
Fix 3: Restore Your iPhone
Restoring your iPhone is the most common fix for your Home button lag. Just make sure to back up all of your data in iTunes before you restore your device.
To restore your iOS software, connect your iPhone to iTunes and select it under Devices. Find the Summary tab, then click Restore.
Fix 4: Clean Your Home Button
Like anything, after a ton of use, the iPhone's Home button can get dirty, causing it to lose it functionality. Lint from your pocket or old Cheetos dust can find its way into the small crevice encircling the home button.
In order to clean this out properly you want to use isopropyl (rubbing) alcohol and a cotton swab. Put a few droplets of alcohol directly on the Home button and push down on it using the cotton swab. Wait a few minutes and then check to see if that fixed the problem.
Fix 5: Twist and Spin
I found this method on a bunch of Mac forums, but never tried it out. While I cannot promise you that this will do the trick, it never hurts to try. Simply place your iPhone on its back, hold the Home button down firmly, and then twist the phone clockwise.
If you have a case, you will probably want to remove it to allow for easier rotating. Why would such a thing work? I have no idea. But if you want your Home button to work again, it's worth a try.
Faux Fix: On-Screen Home Button
If all of these other methods fail and your Home button simply does not function, you always have the option to enable the on-screen Home button. Go to Settings -> General -> Accessibility -> Assistive Touch.


Turn on Assistive Touch and a small circle will appear on the screen. From there you can control volume, Siri, screen lock, and add favorites as well.
Fix 6: Replace Your Home Button
For the those of you who like a challenge, you can try and replace the iPhone Home button on your own. The process is tedious and very difficult, so it's best to do this as a last resort.

Abonneren op:
Posts (Atom)